This series of blog posts describes the process I used to
make the commissioned Palm Canyon art quilt shown below. Today’s post is describing the area on the quilt that I call the "Subsurface". Prior steps
are shown in my previous posts.

Making the Subsurface
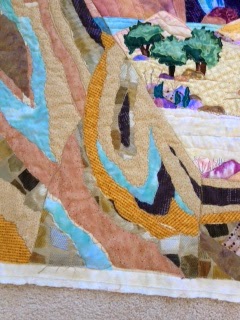
If you look at this photo you see a cut away of the earth's surface showing what goes on below ground. It is separated from the surface by dark bias strips. That is the area I am talking about today.
Since this quilt was made for someone who is a geologist, I wanted the subsurface to look "correct".
Part of what this person loves about the Palm Canyon area is her understanding of the geologic
processes that helped to form it. She
sent me some links to a college geology professor’s notes and photos to use as
reference. It was like going back to school!
I found many of these photos very helpful for designing the subsurface, as described here.
Disclaimer – Although I worked for years with geologists, I am not a geologist. But I looked at the photos and got
ideas for the design that I am going to describe here. This is a simplified, layperson’s
description of what I wanted the subsurface to look like:
- · Layers of rocks and soils are deposited on top of each other over eons of time. These layers look different – color variation, size of rocks and pebbles, etc.
- · Earthquakes shove a part of this layering in one direction or another, so the layers angle up and down. Sometimes the shoving causes rocks to come to the surface and stick out.
- · Some of these layers get completely folded.
- · Earthquake faults separate areas and cause discontinuous sections.
- · Big rocks get in the middle of the soil layers in places.
I am sure any geologist reading this is chuckling at this
time, but those were my rules of thumb. And although I may not know what I’m
doing, I did pass my drawing by the geologist client and she gave it the thumbs
up.
So here are some photos of the subsurface.
 |
| folding |
 |
| different angles |
 |
| fault lines |
Notice the
variety of colors and textures, different angles, folding, rock "inclusions",
jutting to the surface, etc. I did my best to capture this in fabric.
 |
| rock inclusions |
 |
| jutting to surface |
After all the rock pieces were in place, I laid tulle over the entire subsurface to give it a darker value
than the above ground area. I wanted it to be distinctly different looking. I also
sewed bias strips along the fault lines and the barrier between the surface and
subsurface to help further separate these two areas.
That's enough science for today. My next post will be the finishing of this quilt.
Thanks for visiting my blog!
No comments:
Post a Comment