Thursday, March 17, 2016

Mary, Matilda and Me - Face, Arms and Hands

"Mary Matilda and Me" top

I thought I'd do a post today about how I did the human skin in this art quilt. I've seen some people use purchased fabrics for skin very successfully, but I've never tried that. Whenever I've had to do skin, I've painted it on white Kona fabric using Tsukeniko Inks. I blend the inks with Aloe Vera Gel to give me control over where it goes.

Tsukeniko Inks all have a number, which is what I know them by. These are the inks I like to use for Caucasian skin tones.


The yellows, browns and red tones (53, 90, 92) are for the main skin areas, and the blues (19, 62) are for shadow areas.  I create a few different intensities and values of each.


I start by doing a line drawing on the Kona fabric of the face or hand. I use a Frixion ink pen so that the line will go away once ironed.


Then I put in lighter values of the mixed colors.


I work my way up to the darker values and blues. I try to "sneak up on the darks", as one of my painting instructors used to say. That means I try to be careful not to use darks too early in the process.


This is how the faces, arms and hands ended up on this art quilt.

Grandma lecturing one last time
Mom listening intently


Thanks for visiting my blog!


Saturday, March 5, 2016

Wedding Day Dresses

Top - prior to quilting


To make this fiber art piece I used my standard technique of doing a small scale drawing, enlarging it to full size and then using the full size drawing to make pattern templates.  I made templates for the two dresses from the full size drawing. I wanted to use vintage fabrics as much as I could, so I pulled out my stash of inherited fabrics.

I had a nice piece of lace that was very suitable for the bride’s dress.  I had plenty of it too, so I could make the skirt wide and put some folds in it to give a feeling of fullness. I under-laid the lace with a solid white fabric from the bodice down. That is how the actual bridal gown was made. The arms and upper torso were sheer lace.

I modified a vintage piece of  pale blue-green fabric to create the “Mother of the Bride” dress. This blue green fabric was inherited from my Mother’s stash, and it was a solid.  I decided I wanted a little bit more variation in that fabric, and I was looking for something that would read like a blue-green print fabric.  To accomplish this I pulled out a roll of lace and cut about 4-30 inch lengths of it. I then sewed these to each other lengthwise. This approximately 30” x 20” section of lace became my stamping template for the fabric. I over-laid the lace section on the blue green fabric and then stamped on it with fabric paint.  The paint went through the holes in the lace pattern and created a variable surface design. I thought it looked much better than the solid and I was happy with the result.

I know I could have purchased a fabric instead, but I wanted to use my inherited fabrics for this and thought it was worth the effort.  Here are some photos of the process and results.

lace template on fabric, painting in progress
A section of fabric after painting

dress on background fabric


close up of dress

Saturday, February 27, 2016

Shaped by Fiber II


If you did not have a chance to see Beyond the Edge's Shaped by Fiber II exhibit at the Mission Viejo Library, here is a link to a video of that exhibit. It really was a very nice exhibit. The video was created by Luke and Laura Bisagna. The fiber art vessel to the right was created by Linda Friedman.

https://vimeo.com/156105732

Friday, February 19, 2016

“From Matilda to Mary to Me “


Wedding Day photo


This is a photo of my Mother and my Grandmother on my Mother’s wedding day.  It shows my Grandmother, Matilda, giving my mother, Mary, some advice.  It was one of my favorite photos to look at when I was growing up.  My Mother used to make up stories about what the advice was that my Grandmother was giving her.  I always wanted to make an art quilt based on this photo, and now I have! Here is a picture of it:
"From Matilda to Mary to Me"

 
Do you have a bucket list of art quilts you want to make before you go on?  Well I do, and this was on it.  It's nice to have another item off that list! 

I wanted to give this piece an old time feeling and I tried to do that by adding fans and using lace in the wedding dress.  I’m going to do a few posts in the near future about the making of this art quilt and show some of it in more detail.

 Thanks for visiting my blog! 
Tuesday, February 9, 2016

Mixed Media!


Bud Vase, mixed media


I have experimented with mixed media art techniques off and on over the years. I really like the look of mixed-media art work, and would love to do more of it. The painting above is an example of one of my experiments with mixed media on a failed watercolor painting. It started as a watercolor painting of a bud vase in front of a fireplace. The vase and flower looked ok, but the background did not work. So I used mixed media techniques to change it.  I have stamped it, glued papers to it, and used pen and watercolor pencils. I am much happier with it now, after these changes. I still think I need to make the ink drawing of the vase and flower darker, though.


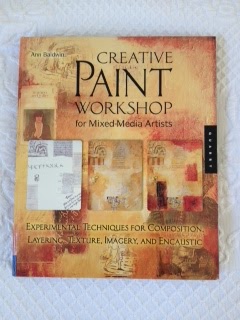
Last year I purchased this book on mixed-media techniques.


It has some great examples in it and I plan to try some of them out over the next few months. In particular I'm trying to find ways to incorporate fiber into my mixed-media work. I'll post some progress photos here from time to time to show you what I've come up with.


Thanks for visiting my blog!

Friday, January 22, 2016

Urban Graffiti at Road to California

If you are going to Road to California this weekend, I hope you have a chance to see the Quilts on the Wall Exhibit, " Urban Graffiti", and the Beyond the Edge exhibit "Infinite Connections. I have art quilts in both of these exhibits. Here is a photo of my "The Krew" piece in Urban Graffiti.


The Krew


Thursday, January 14, 2016

Julia's Bonsai - Some Details...

I thought I'd show some details of the bonsai fiber art piece that I made at the end of 2015.


As I mentioned previously the bonsai image was printed on fabric. The fabric printed image is shown here.


I added borders to this image first. The white border is ultrasuede, and blue border is a denim tone-on-tone fabric. 


I then sandwiched the top and did quilting stitches on it. Here is a detail showing of some of the quilting stitches I used.


 I also did some thread painting  to enhance the foliage on the bonsai tree. Here is a photo of the thread painting. 


I used small zigzag stitches for the thread painting on the foliage. It helped to fill the area faster, and I like the appearance of those stitches better.

After the quilting was done I sewed a binding on the fiber art piece. I used a single layer of the denim fabric for the binding and hand stitched it down.

Thanks for visiting my blog!