Tuesday, September 30, 2014

Textures Show is Next Weekend!

I'm so glad I joined this great group of fiber artists based in the Temecula area. Their work is very impressive and inspirational. The Textures big annual show is this weekend. I'll be at the reception on Friday night and I hope to see you there!


The Gallery at the Merc Presents:

Textures – Fiber Arts

Contemporary Fiber Art Exhibit in a Gallery Setting

October 3, 2014 through November 2, 2014

Artist’s Reception

Friday, October 3rd, 5:30 pm - 7:00 pm
Gallery at the Merc
42051 Main Street, Temecula, Ca. 92590
Gallery hours are subject to change. Call 866-653-8696 for information and times.

Monday, September 29, 2014

Blog Hop!!!!

Well this is my first foray into the Blog Hop-o-sphere, and I have Deborah Stanley to thank for inviting me. The blog hop theme is “sharing our art and creative process”. I am an artist whose primary media is fiber, but I also do watercolor painting and mixed media work. I am a member of several fiber art groups including Beyond the Edge Fiber Artists, SAQA, Textures, and Quilts on the Wall. I use my blog to show the fiber art pieces I make and how I make them. I believe in giving useful technique information to the blog reader so they get a benefit from reading my blog.

First I want to acknowledge Deborah Stanley who has been a wonderful artistic friend whose support has helped me improve as a fiber artist. She is extremely generous in her support of other artists. I’m lucky to know her. Deborah does beautiful work and I find her human forms and portraiture exceptional. You can see it for yourself by visiting her blog:


What am I working on? These last few months have been extremely busy creatively. It seems like every group has a deadline in September or October this year. I have been working on several fiber art works simultaneously. Projects I have been working on include:

Moon Shadows” for Quilts on the Wall’s “Shadows” exhibit, shown here:


A “Bonsai” piece for the Texture’s Fiber Arts Merc show. This piece is based on a water color painting I have done. The painting is shown here:


And, a piece for Beyond the Edge Fiber Artists exhibit called “My Inner Self Portrait” (detail shown here):


Sorry to be coy by only showing a detail shot or the water color painting, but I’m not permitted to display the entire pieces until the shows. The "Bonsai" will debut at the Merc show which is the first weekend in October, so I’ll be showing that one soon on my blog. The “My Inner Self Portrait” Exhibit will debut at Road to California 2015. I will show it in late January.

I am also working on a piece for the City of Temecula through the Textures group. It is a group project, and the part I am working on involves a depiction of the City Hall buildings. This will be presented in December. Here is a photo of the City Hall buildings that I am working from:


How does my work differ?   It's made by me! Its the only work out there that is made by me! That plus, I have many nature and fishing themed pieces, and I use more than one approach to making quilts, so my quilts don’t all look alike. I have some that are fabric collage, some that are painted and have a watercolor look, and some that are a combination of techniques.

Why do I create? Because I am a creative person and I can’t stop myself. If you are creative you know what I mean. I have ants in my pants to go and work on a creative project. It’s just who I am!

My process is? I show this regularly on my blog and it’s too long to describe here. So I will put in a simplified description: 1) create a sketch; 2) enlarge the sketch to the desired size; 3) put the sketch on the background fabric; 4) use paint or fabric to create the image on the background. For more details please see my past and future posts!

Next blogger in the hop: I am inviting Nicole Morris and Beyond the Edge Fiber Artists to be next in the blog hopping.

Nicole Morris is  a good friend and blogger. She does very stunning quilts and always seems to have a creative approach to her quilt making. She often comes up with unique methods to simplify a technique. She is also a teacher and great techie! She has taught me many tricks on the computer! You can see Nicole’s blog by clicking on this link:
Nicole's blog

Beyond the Edge Fiber Artists is a group I belong to. They are a group of fiber artists whose work is stunning. You can check them out by clicking on this link: Beyond the Edge Fiber Artists

Thanks for visiting my blog!

Saturday, September 27, 2014

Moon Shadows - Applying Oil Paint Stick

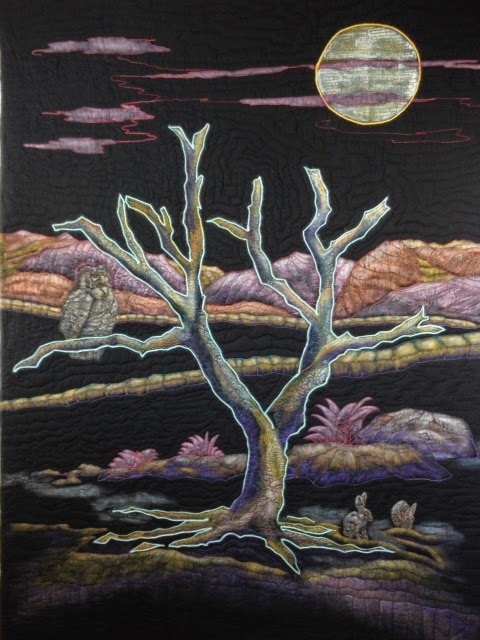
This is a photo of the finished Quilt I am calling "Moon Shadows". 

Moon Shadows


I've been talking about how I made this quilt in my last few posts. My last post described the machine quilting. Today I am going to talk about applying the oil paint stick.

You can apply oil paint stick to the quilt top before quilting, or you can apply it to the sandwiched quilt top after the machine quilting is done. You get different appearances with each technique. If you apply it before quilting the oil paint stick covers the area you apply it to entirely and gives a smooth coloration look. 

before quiting


If you apply it after the machine quilting is done the oil paint stick adheres to the “high” part of the fabric that sticks up around the stitching lines. The fabric at the stitching lines doesn’t get as much of the oil paint stick, and the background fabric peeks through. This method accentuates the machine quilting more, in my opinion.

after quilting


For this quilt I chose the latter method of stitching first and then applying the oil paint stick.

Oil paint sticks dry on the surface and get a “skin” that must be removed before using. I use a utility knife to cut the surface skin off, revealing the soft oil paint stick beneath it. I try to remove enough to expose about a nickel or quarter size part of the top of the stick. I cut off the dry skin onto a plate and then dump the plate contents in the trash. This helps prevent oil paint from the soft side of the skin getting on anything. Trust me, it happens.

removing the skin


To apply the paint, you can rub a brush across the exposed paint stick and then brush the paint on the fabric, or you can rub the stick directly on the fabric. If you are applying to a small area a brush is a better choice. For larger areas I use the whole stick. 

The brushes that I have found work best are very stiff stencil brushes. Here are the brushes in my collection.

brushes


I use a thin brush for applying the oil paint close to the edge of a shape to prevent it from getting in an area I don’t want the paint. I use a round brush for other areas.


If I apply the paint stick directly to the fabric I blend it in with a wide brush. This also works well if you have two colors near each other that you want to transition to.

blending


Here are a couple things to be aware of:

Oil paint stick can take about three days to dry. During those three days I don’t let a painted area touch any other part of the top. So if I fold the quilt, its front side out. I usually place a piece of scrap fabric over the top of the painted area to protect everything. The paint is not truly “wet”, but it has the potential to get color on a place you don’t want it to be. It feels a tiny bit tacky to the touch.

After three days I press the painted area. I place a piece of scrap cloth or paper over the painted area while pressing. Very little if any color comes off after three days.

There is an odor during the drying or curing process. It can take a couple weeks for the odor to go away completely. It is not a strong odor, but if you are sensitive to odors you should ventilate your working area.

The oil paint dries soft. The fabric is not stiff after drying and will not crack. At least not in my experience, which is a few years of using it.

The oil paint sticks I use include Shiva sticks and those made by Winsor Newton, called Oil Bars. The Shiva sticks have a pearlescent quality which I love. The oil bar is more of a matte appearance.

oil bars I use


That’s all for today. My next post will talk about clean up and storage of the oil paint sticks. 

As always, thanks for visiting my blog!


Friday, September 26, 2014

Beyond the Edge Fiber Artists Exhibit at Palm Springs Show

I'm a proud member of Beyond the Edge Fiber Artists and want to be sure you know about this upcoming exhibit at the Palm Springs show:

Beyond the Edge "Fiber Perceptions" Exhibit
at Mancuso's Quiltfest Oasis Palm Springs
October 2 - 4, 2014


Quiltfest Oasis Palm Springs
Palm Springs Convention Center
277 N. Avenida Caballeros
Palm Springs, CA 92262

Show hours 10am to 6pm daily

Fiber Perceptions” - an exhibit from Beyond the Edge Fiber Artists
 
Perception is defined as: "the ability to see, hear, or become aware of
something through the senses." The artist's eye perceives something worth
capturing in everyday scenes or objects -- perhaps it’s a shape or color
that catches their eye, a glimpse of a memory from long ago, or simply the
contrast with one’s surroundings.  Things that others may see as plain and
ordinary, an artist may perceive as special and extraordinary, something
worthy of artistic interpretation. This exhibit represents individual
artistic perceptions, seen with clear vision and interpreted in a fiber
medium. 
 

Fiber Perceptions Artists: Linda Anderson, Madeleine Bajracharya, Laura Bisagna, Mia Bloom, Cynthia Catlin, Linda Friedman, jo p. Griffith, Mary Beth Kile, Teresa Shippy, Eileen Wintemute

Monday, September 22, 2014

Desert Sunset II - Couching, Image Stitching, Machine Quilting


In my last post I talked about transferring the design to the black background fabric. The photo above shows the image drawn on the background. I wanted to make sure the moon and tree stood out more than the other features, so I couched around each of these with yarn.

Before stitching I pinned a piece of light weight interfacing behind the black fabric to add some body to the fabric as it is being stitched. The interfacing acts as a stabilizer. I cut it out after the couching of the yarn is done to make sure I didn't have anything too stiff to machine quilt through.

By couching I mean that I stitched yarn down to the drawn line using a zig-zag stitch. I did this on my Pfaff 1475 CD machine. I used this presser foot for this process:


This foot allows me to have the yarn slide under the bump in the center of the foot. I have had good luck using this foot for couching. I hold the yarn to the left and let it feed in as I go. I can see the stitching on the drawn line in the slot in the foot. Here is a photo of me stitching down the yarn around the moon shape.


Here is the top with the yarn couched.


My next step is to sandwich the top with batting, and backing. I use black batting when I have a dark top. If any of the batt comes through the top (bearding) you can’t see any of the light colored whiskers from it.

Once the quilt sandwich is made, its time to do all the machine quilting for this piece. For the design lines I stitched using bright colors of threads. My thread colors included pinks, fuchsias, golds, and tans. I also machine stitched inside the design elements. The stitching inside the features is a large part of the design of a quilt like this, so I tried to use interesting stitches. You can see some examples here of the stitching patterns I used. These photos show the area after the oil paint stick has been applied, but you can still see the stitches.


After the design elements were quilted I stitched the background using a navy thread. I thought the navy color would add a little more visibility to the stitching if you are close up to the quilt. I tried to cover the top so that the stitching occurred at least every ½ to ¾ inch on the top. Here you can see the stitching in the black background area.


After all the machine quilting is done its time to apply the oil paint stick. That will be the next post. Stay tuned!


Thanks for visiting my blog!

Friday, September 19, 2014

Textures Show Reminder

The Textures show in Temecula is just around the corner, so I'm re-posting information here as a reminder. I hope you will be able to see this exhibit!


I am very pleased to be a part of the fiber art group - "Textures". This is a Temecula based group and they have a fiber art exhibit each year that starts the same weekend as the outdoor quilt show. The fiber art exhibit continues for about a month. It is held in a charming building with an art gallery called "The Gallery at the Merc". It is located in the Old Town area of Temecula.

Textures has thirteen artists and they each have two pieces in the show. These pieces have never been seen before so its all fresh art work!!! It should be a wonderful show. I will post about my two pieces after the show starts.

There is an artist's reception on Friday, October 3rd, from 5:30 pm to 7:00 pm.  I hope you can attend the reception and definitely see the exhibit! I've included information below on the exhibit and a link to the Textures website.


Textures – Fiber Arts

Contemporary Fiber Art Exhibit in a Gallery Setting

October 3, 2014 through November 2, 2014

Artist’s Reception

Friday, October 3rd, 5:30 pm - 7:00 pm
Gallery at the Merc
42051 Main Street, Temecula, Ca. 92590
Gallery hours are subject to change. Call 866-653-8696 for information and times.

Monday, September 15, 2014

Moon Shadows - Transfer Image to Background

As I showed in my last post, the design for "Moon Shadows" is shown below. This design is sketched to scale since I know it needs to be accurate when I enlarge it.

Moon Shadows Design


My desired finished size is 3 feet by 4 feet, portrait orientation. I took my “to-scale” drawing to Fed-Ex Office and used their large format printer to make the full size drawing. I have a projector, but I find it easier and more accurate to just go to Fed-Ex. They charge about $0.75 per square foot printed. For the time it saves me, and more accurate representation, the cost is well worth it. I say more accurate representation because sometimes the image lines are blurry using a projector and the sizes of features change a bit. Plus I don’t have to wait until dark to get it done, like I do with my projector. Here is the full size enlargement:

enlarged design


Once I have my full size print, I transfer the image to the black background fabric. I had planned to use a heavier black fabric that had a lot of texture to it, but I found that I couldn't see through it with the light pad, so I switched to this black cotton.

black fabric


I pinned the fabric to the print in a few places and then laid it over the light pad. I used a chalk pencil to draw the image onto the black fabric.  Here you see me drawing it to the fabric and the enlargement under the fabric. 


tracing the image


Here is the image drawn on the fabric.

image transferred


I'm ready for the next step, which is couching yarn. That will be my next post...

Thanks for visiting my blog!

Thursday, September 11, 2014

Desert Sunset Series - Art Quilt

I recently gave a talk at a local fiber art group and pulled out all my art quilts to prepare for it. While doing this, I noticed that the name I gave the quilt shown below is "Desert Sunset I". Well I made this quilt about 3 or 4 years ago and so far there is no Desert Sunset II! So I think its high time I got on that.

Desert Sunset I

I made this quilt by first thread painting the design, and then using oil paint sticks on the stitched images on the black fabric. That is the technique I plan to use for the next in this series. 


I printed photographs I took in a recent trip to the Scottsdale area. I was on a golf course and loved the look of the desert homes, cacti, rolling hills, rabbits, etc. These are many of my photos, plus one from a copy right free site on the Internet of an owl.


My first thoughts were to make something with desert home structures on a hillside with cacti and rabbits. I traced the homes and rabbits and started arranging the traced images. I couldn't come up with something that really appealed to me, however. It needed something more.


On one of my trips to this area there were large owls perched in trees,  I thought they looked very cool.  I love birds, so I decided I wanted to include an owl on a tree branch.

Well, a tree branch requires a tree. So back to the drawing board. I pulled out photos of trees and came across some dead tree shapes I had taken from a trip to Bryce Canyon. I started to work on a sketch using those trees as inspiration, and came up with a tree shape I really liked. But, with the tree and owl, there just wasn't room for all the elements, so many of my starting ideas were dropped. They will have to wait for another in the series, I guess. Ultimately, this is what I came up with for my design:


There are no desert homes, but I do have a tree, bunnys, an owl, hills, a moon, clouds, rocks, and some desert plants. I am happy with this, even though it is far afield from what I originally had in mind. Next step is to enlarge the image to my finished size.

Thanks for visiting my blog!


Monday, September 8, 2014

Shades of Passion - SAQA Fiber Art Exhibit

I am pleased to have two of my art quilts in the upcoming Southern California SAQA member show, "Shades of Passion".  I will have two of my city-scapes in this show, "A Slice of the OC" and "It was a Cold and Stormy Night".

This exhibit runs October 2 -31.  There is an artist's reception on Friday, October 10, from 5 to 8 pm. This postcard lists the members whose work is in the show. Last years show was beautiful and I expect the same for this year. The show location information is listed below the postcard. I hope to see you there.


Poway Center for the Performing Arts
15498 Espola Road
Poway, CA 92064
858-668-4693


Wednesday, September 3, 2014

Textures Fiber Arts Exhibit - October 3rd through November 2nd - Mark Your Calendar!

I am very pleased to be a part of the fiber art group - "Textures". This is a Temecula based group and they have a fiber art exhibit each year that starts the same weekend as the outdoor quilt show. The fiber art exhibit continues for about a month. It is held in a charming building with an art gallery called "The Gallery at the Merc". It is located in the Old Town area of Temecula.

Textures has thirteen artists and they each have two pieces in the show. These pieces have never been seen before so its all fresh art work!!! It should be a wonderful show. I will post about my two pieces after the show starts.

There is an artist's reception on Friday, October 3rd, from 5:30 pm to 7:00 pm.  I hope you can attend the reception and definitely see the exhibit! I've included information below on the exhibit and a link to the Textures website.


Textures – Fiber Arts

Contemporary Fiber Art Exhibit in a Gallery Setting

October 3, 2014 through November 2, 2014

Artist’s Reception

Friday, October 3rd, 5:30 pm - 7:00 pm
Gallery at the Merc
42051 Main Street, Temecula, Ca. 92590
Gallery hours are subject to change. Call 866-653-8696 for information and times.