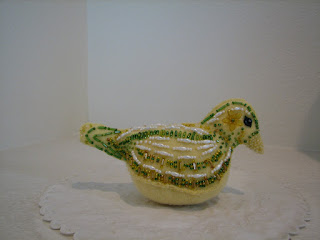
I thought I'd show a couple of progress photos for the making of this beaded bird. The bird is about 6 inches long and 3 inches wide. I made a pattern for the bird through the time honored process of trial and error. I wanted a bird that had a wide body so it had some presence and stability. I also didn't want it to be too big overall because that would mean more beading. I didn't want to get bored with it before I finished it. I can always enlarge the pattern if I want to go larger. I made a few different bird patterns trying to make them resemble different kinds of birds. I don't know how effective I was. They tend to look pretty similar after they are done.

I used wool fabric for the body. It is easy to hand stitch in to, and it doesn't show any indentations from the stitches taken in it. It is also strong enough to support the beads. I cut the bird body parts out and hand sew them with a whip stitch. The seam is on the outside. I leave the back seam open for filling.

Here you can see the opening on the back. I put a sack filled with walnut shells in the bottom of the bird to give it some weight and stability. Then I stuff it with fiber fill or left over batting pieces. I stuff it tightly, using the wooden end of a paint brush to push the filling into the beak and tail. After I have it filled completely I hand stitch the opening closed. Next comes the beading.

This is my beading box. I put it on my lap or a table and even if I am clumsy the beads stay in the box. It is the top of an Apple computer box. It has a black fabric in the inside of the lid which provides a nice non-rolling surface for beading.

I keep beads, scissors, needles, thread, a thimble, and bead scooper in the box, along with my bead hoop. The bead hoop has a spongy fabric in it that holds the beads and makes them easy to pick up.
I don't know what the design will be when I start the beading on a bird. I just figure it out as I go along. Here are some detail pictures:

I put a flower on the cheek. The dark around the eye is a small piece of ultra-suede fabric.

I always like to put a heart button on the chest of my birds. I think that's all I have to say today about this bird. Thanks for visiting my blog!


