Tuesday, December 18, 2018

Happy Holidays!


"Autumn Tree Copse", mixed media painting by Eileen Wintemute


I wish you the very best for the New Year. Enjoy the holidays and I'll catch up with you in 2019!
Thanks for visiting my blog!


Friday, December 14, 2018

"Waste Not, Want Not" Close Ups


"Waste Not, Want Not" 


I thought I would show some details of this fiber art piece in this post. This first detail has a block with fruit and a leaf from a fabric painting class, a left over leaf block from a completed fall quilt, and a couple of pieces that are my watercolor paintings printed on fabric. 


In this detail - The horse rider was a test piece I made for a commissioned quilt. I placed it on an abstracted landscape fabric image I painted from left over paints. It looks like he's riding in to the landscape. The flamingos are watercolor paintings I did that I had printed on fabric. The pieced areas are from blocks I made in one of my first quilting classes.


  In this detail I have a couple of pitchers that I made during my "still life" obsession. The mission bell was painted for a California Mission based art quilt I made a few years ago. It didn't make the cut for the quilt, but here it is! Lastly, there is a painting of my own hand that I made for a painting practice exercise.

As you can see, in addition to a still-life phase I also went through I bird house phase. This art piece is like looking back through a scrap book for me. I think that is enough of the details and I thank you again for visiting my blog!


Wednesday, December 5, 2018

Using Your Leftover Pieces


This is one of my recently completed art quilts, and I'm calling it "Waste Not, Want Not". It is created from left over fiber art parts and pieces. Many of them were test pieces to see if a technique would work, or pieces created in a workshop to learn a technique, or the start of an idea that had not been completed.


I have a lot of these leftovers, and the picture below shows a few bags that are filled with them.


I challenged myself to create an art piece using as many of these as possible. Here are some guidelines that I have figured out for doing something like this:


* Have a variety of sizes of pieces, and put the larger pieces down first. Try to place them so they add balance to the overall design. By that I mean don't place too many on one side, or too many on the top or bottom. Placing the biggest pieces on the bottom is better, in my view.

* Add medium sized pieces next and then go to smaller ones. Just place them down and then adjust their placement. Use smaller pieces at intersections to act as connectors or highlights.

* Put a lot of pieces down initially to see what works well together. Thin things out later, but first get a lot of parts down.

* Look for color trends that please your eye. Thin out pieces in colors that don't work with the majority.

* Cutting out shapes that have curves and placing them on a lot of pieces that are squares or rectangles adds interest.

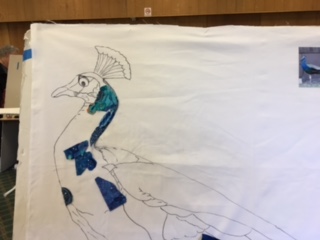
Below I show an in-progress photo of the top before I thinned. I thought it was too busy and I removed a few pieces, and in their place I added dark blue fabrics. The dark blue worked as a nice unifying color.


This photo helps to show the blue pieces that were added. The process is one of trial and error. I found it a fun task and I think I still have enough leftover pieces to make another "leftovers" art quilt one of these days.

Thanks for visiting my blog!


Tuesday, November 20, 2018

Waste Not!


One of my favorite life philosophies is "Waste Not, Want Not". It is partly because I am thrifty by nature, but it is also because I don't have a large art studio and can't function well when I'm overwhelmed by clutter. I have learned to try to make use of what I have before buying more to save space, time and money.

I am proud to be a member of "Beyond the Edge Fiber Artists". We have an exhibit being created right now with the theme "Say Something". We are to choose a phrase and make a fiber art piece based on that phrase. The phrase is supposed to be meaningful to us personally. So I have chosen "Waste Not, Want Not" as my phrase. Below is the fiber art piece I  created for this exhibit:


Over the next couple of posts I'll talk about how I made this piece. I hope to give you some ideas for reusing some of your items.

Sorry to have taken so long since my last post. Between trips and a few other things I just didn't have the time. Thanks for visiting my blog!


Friday, October 5, 2018

I have two pieces in PIQF this year!


"The Royal Treatment"


I'm going to the Pacific International Quilt Festival (PIQF) in Santa Clara this year, and it will be especially nice since I have two art quilts on display there.

My peacock quilt, "The Royal Treatment" was accepted in the "That'll Be The Day" quilt competition at PIQF! I shipped it this week.

My "Bird of the Night" piece will also be there as part of the  Beyond the Edge Fiber Artists "Put A Bird On It" special exhibit. 

"Bird of the Night"


PIQF runs from October 11 through 14, and is at the Santa Clara Convention Center. The address is 5001 Great American Parkway, Santa Clara, CA, 95054.

Thanks for visiting my blog!


Monday, September 24, 2018

"Home on the Range" Pillow

  This is a little back pillow that I made for my computer chair. I had some leftover paint in my fabric painting palette one day, and I decided to use it up instead of washing it down the sink.

Here is the painting on the white fabric that I used:


It's not a great painting but I liked trying to create something from what otherwise would have been wasted.

Here is the top after I cut the painting down and sewed on some side panels. I also couched some yarn down around the edges of the painted area and on the border.


This is the back fabric that I used. I sewed overlapping panels so that I could slip the pillow form in it.


Waste not, want not is a great philosophy.

Thanks for visiting my blog!


Wednesday, September 19, 2018

Renee's River

Renee's River


I'm looking forward to an upcoming fishing trip, so I thought I'd post a watercolor painting I made from a photo my friend  Renee took on a river. Renee and I will be sharing some good times soon, and this painting makes me think of her.


Tuesday, September 11, 2018

"The Royal Treatment"

In this post I am showing final photos of my peacock piece. I am very happy with the way it turned out!

"The Royal Treatment"

As you can see, I added a suggested horizon line with a sunset in the upper right, and ground surface for the peacock to stand on. I didn't want it to look like the peacock was floating in mid air. I also thought that the area in the upper right was very large and needed something to fill in the space. 

I decided to name it "The Royal Treatment", because peacocks look like the royalty of the bird world. They even have a crown!


Here are some detail photos:


 Thanks for visiting my blog!

Thursday, September 6, 2018

Beyond the Edge Exhibit Starting


"Pelican on Pier"


I am a proud member of Beyond the Edge Fiber Artists, and we have an exhibit opening soon at the Potaki Art Center in Mission Viejo. The exhibit is entitled "Exploration in Fiber" and it opens September 8th.  It will run for about two months. 

The Potaki Art Center is located at 27301 La Paz Avenue, Mission Viejo, CA. Phone number is 949-470-8470.

I hope you have a chance to see the exhibit. It will have a wide variety of art pieces from 7 different artists. 

Thanks for visiting my blog!


Tuesday, September 4, 2018

Constructing the Peacock's Tail


In this post I'm going to show how I made the peacock's tail.  The peacock's tail in my photo can be seen through, so I wanted to create that kind of effect.


There was also an iridescent quality in the feathers that I was hoping to mimic with fabric.


I looked at yarns with a glittery thread in them, as well as fabrics. I decided to use a combination of sheer fabrics. I used organza and what JoAnn's fabric calls "specialty fabrics". These are found in the bridal area.


The photo below shows the start of putting down strips of these fabrics.


I needed a combination of light, medium and dark strips. Here is another in-progress photo of the tail.


I just kept working at it to give it a full appearance. Once the tail pieces were in place, I glue tacked them down and then machine quilted through them. The peacock is almost done at this point. My next post will be the final photos and details. Thanks for visiting my blog!


Wednesday, August 15, 2018

Next Step - Quilting!

After getting the background set, I placed the cut out peacock on the background and used a tacky glue to hold it in place until it was sewn down.


I started the machine quilting on the peacock itself. I used a tight meandering stitch to secure all the little pieces that make up the body of the peacock.


I considered placing tulle over the entire bird and stitching on top of it to make this process easier, but I didn't like the change in color that resulted from the tulle. The only area that I used tulle was the white/gray feathered area on the back of the bird.


After stitching down the bird I started on the background. You can see the area near the feet of the bird has been stitched in the photo below.


I moved around the background and did the majority of it, saving the tail area for last. The peacock's tail extends down to the ground, so I needed to add more tail pieces in this area, and use the stitching down of the tail as the quilting stitch. I will show that on my next post.


Thanks for visiting my blog!


Wednesday, August 8, 2018

Peacock Background Process


I'm showing photos from the creation of a peacock art quilt that I started in a workshop with Susan Carlson. This post shows the progression of making the background. 

Here I am cutting out the peacock collage piece from the muslin that it was built on:


Next I did a lot of experimenting with different fabrics to find the right design for the background:

 I liked the orange colors. They make the peacock colors pop.


I considered making the bottom darker, as if it was a ground surface. This idea was considered but I rejected it.


  I wondered if putting blues in would make it tie back in to the peacock. I considered this but rejected it.


I did many other iterations and this last one is close to what I ended up doing. It took me a long time to figure out what I wanted to do on this. It really was a struggle for some reason! But it is done now, thankfully!

Thanks for visiting my blog!

Sunday, July 29, 2018

My Peacock Project!

In the spring of 2017 I took a workshop with Susan Carlson to learn her fabric collage technique. It was at the Asilomar Conference Center. The workshop was a fun and worthwhile experience. I started a peacock art quilt in that workshop. I am almost done with it, so I thought I would use the next couple of posts to show the progression of the making of this art quilt. Here are some photos:

My inspiration was a peacock that I saw at a zoo in Hawaii. Here is my photo of that peacock:


My drawing from that photo:


The drawing on white muslin. The collage process has started.


In progress:


This was about as much as I did in the workshop. Once I got it home I finished the bird up and then it was time for the background. I'll show that in the next post.  Thanks for visiting my blog!


Sunday, July 15, 2018

"Exploration in Fiber" on Display at Cerritos Library


I am a proud member of Beyond the Edge Fiber Artists. We have an exhibit on display at the lovely Cerritos Library right now. The exhibit is called "Exploration in Fiber". Below is a photo of the exhibit showing one of my art quilts that is in the exhibit:


There is art work on display from seven fiber artists. The library and surrounding area is beautiful and it is worth the trip to see it.  It's also not far from shopping and eating opportunities!

The exhibit runs at Cerritos until September 8th, and then it moves to the Potaki Art Center in Mission Viejo for about two months. I hope you will have a chance to see it in one of those two locations.

Cerritos Library is located at 18025 Bloomfield Avenue, Cerritos, California. The phone number is 562-916-1350.

The Potaki Art Center is located at 27301 La Paz Avenue, Mission Viejo, California. The phone number is 949-470-8470.

Thanks for visiting my blog!

Wednesday, June 27, 2018

A Bunch of Gourds and a Cat for Good Measure

That title sounds like the name of a children's book to me. But it's not! It is the topic for today's post. I'm going to show you the details of some of the features on this art quilt:


I have shown the witch previously.  After I made the witch I realized I still had a lot of real estate to fill in on this piece, since it had to be square in shape and 35" x 35".  So I looked at some pictures of witch's rooms on line and got some ideas.


My original design included pumpkins surrounding the witch, so I started there. I made a lot of gourds and pumpkins from various fabrics, including lace. I wanted to have a variety of shapes and colors.  Each of the gourds was shaded and highlighted as necessary. Here are some photos of this work in progress:


 I cut out several of the same shape from different fabrics. I stacked the fabrics and then cut the shapes out from the stacked fabric. The tough part was figuring out the placement for the gourds. Here are some trial placements:


After a while it just gets confusing!

Moving on to the black cat about to cross our path....I started with a sketch of the cat I wanted to put in the piece.


From there it was just a matter of making the cat from black fabric and doing some highlighting. I used a bit of green in the highlight paint.


In my next post I'll show the table. Thanks for visiting my blog!