Friday, April 28, 2017

Stitching the Background


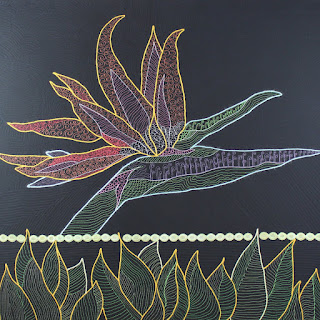
I'm going to use this post to show how I quilted the background on my Bird of the Night piece. This is a detail that shows a little bit of the stitching that I used near the interface of the lower leaf area and the upper flower head area. I used horizontal lines around the leaves and switched to stitches in different directions above the leaves. I wanted a separation between the two areas and used directional change to help with that.

I did the parallel lines using free-motion stitches. They are not perfectly aligned and straight, but that did not make a difference in the overall look I was going for.

Since I used a black fabric, it's difficult to see the stitches.  I used my photo editing software and lightened/increased contrast on a couple of photos to help with the visibility of the stitching. Here are some other background stitching areas that are a little easier to see:

     I'm not sure if you can tell, but I used a dark blue thread instead of black. It still reads as black on the fabric, but when you are stitching, that slight amount of color difference allowed me to see what I was doing a little more easily.


I parallel stitched in varying directions all over the background. I avoided any horizontal parallel lines in the flower area because that stitch direction was used on the bottom only.


That's all I have to say about that! Next time I'll talk about the trim I used between the leaves and flower.

Thanks for visiting my blog!
Friday, April 21, 2017

Quilting in Progress - Bird of the Night


Today I'm going to show some of my choices for free motion quilting. Before I did the free motion quilting I had pin basted the three layers (top, batting and back), couched the major shapes and straight stitched inside the major shapes to divide the area up. Below you see it with the pin basting done and couching in progress.


After this step was done it's time for creative free motion quilting!

Thread color choices:

A few years ago I bought some Superior Super Bright threads. They almost have a fluorescent appearance and I love them for areas that need to stand out.  These are what I used almost exclusively on this piece. The bright color against the black background was necessary for the image to been seen from a distance.  I found many other light and medium values did not stand out enough when I looked at it from a few feet away.


I had created a color plan and intended to use this as a guide for my stitching. I tested out two choices and preferred the one on the left, below. I deviated from this plan because I found that lavender and other purple colors did not stand out enough on the black background.


Below I show my criteria for free motion quilting stitch choices:


1) Choose a design that fits in the space well or adds a direction for eye movement:


I did this on the leaves. I wanted them to read like leaves, so I stitched directionally away from the center leaf vein. It also helped to give shape to the leaf.


2) Choose some designs because they are tighter and add more color:


Stitch patterns in the flower petals were done in a more dense fashion to make sure the color showed from a distance. I chose stitch patterns that are good fillers.

3) Choose some because they are fun!


I really like the alfalfa sprout-like stitch that I used on the head and on the front most petal. That is just a fun shape to me!


I'll be showing the background stitching in an upcoming post. Meanwhile, thanks for visiting my blog!


Thursday, April 13, 2017

Couching


I'm doing some posts to show the process I used to make my "Bird of the Night" art quilt. This is a detail of part of it. If you look closely at this photo you can see that the bird head and major petals have a piece of yarn stitched around them. The process of sewing down this yarn is called "couching". For me couching is basically using a Zig-Zag stitch over the yarn to stitch it down

I do the couching before I machine quilt inside the flower. It is my boundary line for stitching. I use a wide Zig-Zag stitch for the couching to make sure I cover the yarn.

I used blue yarn and orange yarn, depending on the part of the flower. It makes a nice outline, thicker than machine quilting thread. I also did some straight stitching (multiple passes) over the major dividing lines inside the flower head and petals. Here is an action shot of this work!


I defined the leaves on the bottom the same way. In this area I couched green and yellow yarn. I like this technique to make sure the shapes stand out from the background.


I think I will talk about the machine quilting stitches in my next post. Thanks for visiting my blog!

Monday, April 10, 2017

Upcoming Gallery Show - Expressions in Fiber Art

I love being a member of Beyond the Edge Fiber Artists! We have another exhibit beginning May 1st at the Anaheim Center Gallery.  My work and fiber art created by 7 other wonderful artists will be on display.

There will be an artist's reception on Friday, May 5th from 5 to 6:30 pm.  I would love it if you could be there!

The City of Anaheim will generously provide food and drink at the reception too!  The brochure is shown below, but just in case you can't read the address it is:

250 East Center Street, Anaheim, CA. Put it in your GPS and come to see us!


Thanks for visiting my blog!

Tuesday, April 4, 2017

Bird of the Night - Design


I thought I'd show the process I used to come up with the design for this art quilt. My first step was gathering photos of bird of paradise flowers that I had taken over the years:


I liked the appearance of this one in particular, and made a sketch based on this flowers appearance:


I was making this art quilt for an exhibit that requires a 40" x 40" finished size. To accommodate this size I needed a design element above or below the flower to make a square. I chose the leaf shapes below the flower head because they suggest the flower is rising above the plants greenery.

Once I was satisfied with my sketch I took it to my local copy service and enlarged it to a 40" x 40" size:


A while ago I had done a doodle of a bird of paradise and put a wide variety of shapes in different areas of the flower.


 That doodle gave me the idea to do this piece with thread stitching. The lines inside the flower head and petals will be my guide for different machine quilting stitches. I have some very bright threads that I wanted to use, so I chose a black fabric for the background. I'll show more of this in upcoming posts.

Thanks for visiting my blog!