Wednesday, June 27, 2018

A Bunch of Gourds and a Cat for Good Measure

That title sounds like the name of a children's book to me. But it's not! It is the topic for today's post. I'm going to show you the details of some of the features on this art quilt:


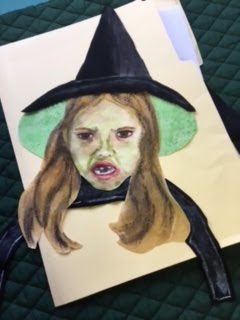
I have shown the witch previously.  After I made the witch I realized I still had a lot of real estate to fill in on this piece, since it had to be square in shape and 35" x 35".  So I looked at some pictures of witch's rooms on line and got some ideas.


My original design included pumpkins surrounding the witch, so I started there. I made a lot of gourds and pumpkins from various fabrics, including lace. I wanted to have a variety of shapes and colors.  Each of the gourds was shaded and highlighted as necessary. Here are some photos of this work in progress:


 I cut out several of the same shape from different fabrics. I stacked the fabrics and then cut the shapes out from the stacked fabric. The tough part was figuring out the placement for the gourds. Here are some trial placements:


After a while it just gets confusing!

Moving on to the black cat about to cross our path....I started with a sketch of the cat I wanted to put in the piece.


From there it was just a matter of making the cat from black fabric and doing some highlighting. I used a bit of green in the highlight paint.


In my next post I'll show the table. Thanks for visiting my blog!


Sunday, June 17, 2018

Ruby Slippers?

I've been posting about the making of this Halloween themed art quilt. In today's post I'm going to show you the broom, pumpkin and shoes on the little witch that is the main event of this piece.


The broom was done in two pieces, the stick and the brush part. Both were made from a fabric that I purchased. Here is the broom stick:

 The fabric for the broom stick looked like a wood grain, which was perfect for this application.


Here is the brush part of the broom:


I used a commercial fabric and painted a red brown color on the shadow side.


The pumpkin that the witch is holding is shown below, with the handle not yet in place:


I made the pumpkin from a commercial orange fabric. I painted the face on and added some highlights and shadows. The handle was stitched on later using a Zig Zag stitch.


Okay, they are not ruby slippers, or even ruby colored shoes. The shoes the witch wore are made from a dark orange fabric. But, they are almost ruby slippers, right?


Thanks for visiting my blog!


Monday, June 11, 2018

A Witch's Outfit

This post is the next in the series showing the making of this art quilt with a little green witch. Today's post will show the dress, hat, shoes and cape.


She is obviously in a black outfit. Black fabric presents some challenges to make it look three dimensional. The key is to put in highlights on the fabric rather than shadows. To make highlights you need a white opaque paint. For this piece I mixed the white paint with a bit of green.


I traced the dress, hat and cape sections from the full size enlargement. I used a solid black Kona cotton fabric for these pieces and a sliver of soap to mark where the folds in the fabric occurred. This was my guide for placement of painted highlights. You can see the soap line on the cape neck and hat brim below.


I mixed my white and green paint and put it on the highlight areas. Below you see a photograph of the highlights on the dress. These highlights definitely give the dress a three dimensional appearance to me.


The inside of the cape and hat presented an opportunity to introduce some other fabric. Here is one of the green fabrics that  I used:


I used a collage technique to place  additional green printed fabrics in these areas.  This is the inside of the cape being constructed piece by piece.


This photo shows the collaged fabric inside the brim of the hat.


I hope this information gives you some ideas for your art quilts. In my next post I'll show the orange/brown parts of the witch's outfit:  the shoes, pumpkin, and broom. Thanks for visiting my blog!


Monday, June 4, 2018

A Little Green Witch


I'm starting to show the steps I used in the making of the art quilt shown to the right. The little green witch is the centerpiece of it, so I'll begin with her.


I had this photo of a little girl dressed up for Halloween as a green witch.  She's got a scary expression, a broom to fly on, and of course a pumpkin for her candy. 


My first step was to trace the outlines of the major features and key lines on a piece of paper.


You see that here, with some preliminary design ideas. I used the line drawing to enlarge the design to full size. The full size enlargement became my pattern for the face, hat, dress, broom, etc. 


I traced the outline of the parts on fabric and then cut the fabric pieces out. The fabric pieces were all painted to give them a three dimensional appearance. 

For the face and hands I traced the outline on to white cotton fabric and painted the skin tones. The skin tones were green this time, a first for me! Below you see the face painting in progress:


These are the Tsukeniko inks I used to create the green skin color:


The hair was also painted. I used Tsukeniko inks and Derwent Inktense pencils for the hair color. I made her hair color a little lighter than in the photograph so that it would be more visible against the black hat. 


In my next post I'll talk about the hat and dress. Thanks for visiting my blog!