Saturday, December 31, 2016

Happy New Year!

I'm looking forward to the year ahead, and wish the very best for you too!

"Winter Tree Dance" - watercolor by Eileen Wintemute


Sunday, December 25, 2016

Merry Christmas!

"Partridge and a Pear" - watercolor by Eileen Wintemute

I hope you are having a wonderful Holiday Season! 

Sunday, December 18, 2016

SAQA 2017 Trunk Show Entry

  Well I've been super busy these last few weeks because of the holidays, and I haven't had much time to spend on art. I was able to put this 7" x 10" piece in the mail for the SAQA 2017 Trunk Show.  It's painted on fabric and stitched. I used couched yarn around the border of the painted area. The border is a navy blue crushed velvet.

I realize that I took this photo before I stitched the back leg on the table inside the arched door! I didn't take a picture after that, apparently. Oh well, just try to envision that the table has a back leg....

I'm calling it Mission Tower.

Thanks for visiting my blog!

Monday, December 5, 2016

Flamingo - Flamango will be in Road to California!


This is an art quilt I recently completed and it was accepted in the Road to California 2017 show! Yippee!!!! I have another art quilt that will be in a Special Exhibit ("Put A Bird On It!") from Beyond the Edge Fiber Artists, but this quilt will be in the contest area. 

Tuesday, November 29, 2016

Diva In The Making - Finished!


I'm going to finish up this project with this post. I have other projects I want to move on to on this blog. I am calling this "Diva in the Making". You can see here that I added butterflies and a shadow under her feet. I have added some detailed shots below that show a couple more features in close up. 


It was a fun project! Thanks for visiting my blog!

Friday, November 11, 2016

And now for the jeans...


This little cutie has on some hippie style jeans - decorations on the side seam and lower edge, and a cute tied belt. I have some blue jean fabric that has flowers in the design and thought it would be perfect for those jeans. Here you see it with my first idea for a tied belt.


I love the fabric for these jeans, and the pink belt would have been cute, but I already knew the background color I was going to use was a brown, and I wanted something that would work with brown better. So I ended up using this blue fabric. This started as a white fabric that had brown embroidery in it. I used textile paints and made it blue. It's been in my stash for quite some time waiting for the right art quilt to come along.


I wanted the creases on the jeans to be visible, so I used a white Inktense pencil to make them stand out more.


Here's what it looks like all put together:


I'll talk about the background in my next posts. Thanks for visiting my blog!


Saturday, November 5, 2016

Diva's Top


This is the photo that is my inspiration for this piece. I wanted to make the top and jeans very similar to that shown in the photo. For the top, I used a polka dot white on white fabric, shown here:

top fabric
I placed the fabric over my full size drawing, on top of a light table, and traced the outline of the top on the fabric.  I also drew in the lines made by creases and wrinkles in the top. My next step was painting the shadows on the top using ink and aloe vera gel. This is what it looked like when I was finished:

painted top
I used blue for my shadows because it coordinated well with the blue jeans and sunglasses. 
The top fabric was a bit see through and I did not want to be able to see the background fabric through it, so I lined it with a tan solid cotton fabric. It worked as a perfect lining for this fabric.

My next post will be about the blue jeans. Thanks for visiting my blog!


Sunday, October 30, 2016

How I Make Fleshtone

Linda Friedman has asked what inks I used to make the flesh tones on my Diva piece, so I'm going to address that in this post. The first thing I need to say is the inks I list below are for Caucasian skin. I am in the process of making a series of art quilts depicting people doing something that to me says "attitude". When I paint someone with other skin tones I will state in this blog what inks I have used to get that skin tone. But, here are the Tsukeniko inks I used for the Diva piece:

Skin tones not in shadow:
95 - Tuscan Beige
92 - Red Delicious
53 - Autumn Leaf


I mixed these three colors together in differing ratios until I get the shade I am after.  As usual, I mix the inks with aloe vera gel. I create lights, mediums and darks (redder tones) from these three and apply them based on the appearance that I am trying to achieve. They give me a yellow to red color, depending on the amount of each ink. I use the photo of the person as my guide to help me decide what color to paint an area.

The colors listed above are good for the skin that is not in shadow. I will paint the entire body part with the shade I create from the three colors, and then I mix together a "shade" color.

The colors that are used to make "shaded flesh tones" are those listed above plus:

19 - Cerulean Blue
62 - Midnight


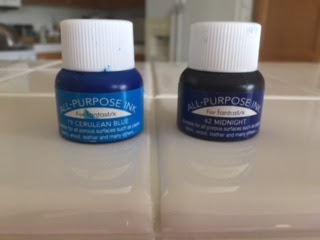
These are mixed with the flesh tones at times, and at other times I will use the Cerulean on top of the skin tone colors after they have dried. .

If I was trying to create an olive skin tone I would probably use a green instead of a blue for my shadow color.

I hope this is not too confusing, but I make various shades of a yellow/red tone and add blues to make them darker for the shadow areas. Feel free to ask another question if you have one. I'll do my best to answer your question.

Thanks for visiting my blog!

Wednesday, October 26, 2016

Hands, Arms and Feet

Just as I showed in my last post, I painted the hands, arms and feet on white fabric using Tsukeniko inks and Aloe Vera gel.


Here you see them close to finished.

Thanks for visiting my blog!

Wednesday, October 19, 2016

The Face of a Diva!

I mentioned in my last post that I use my enlarged drawing as a pattern template. Here you see the enlarged drawing on my light pad, with white fabric laid over it. I traced the outlines of the head, arms and feet on the white fabric so that I could paint them.


Here is the face painting in progress. I used Tsukeniko paints with Aloe Vera gel to do the painting on the fabric. The gel gives me a lot of control over the flow of the paints. they can still bleed with the gel, and sometimes I have to use a hair dryer to dry an area quickly to prevent it from flowing into the adjacent location. But the gel makes the painting technique like using oil paints, but still gives the look of a watercolor.


Here is the face a little further along:


I still need to add some dark shading to the top of the head and a little more shadow on the face near the left side of the nose, but you can get the idea. I think her lips need a little more pink color too, hmm....

Thanks for visiting my blog!

Wednesday, October 12, 2016

New Project - Diva in the Making!

Shannon

This is a picture of one of my nieces, Shannon. She was about 3 or 4 years old, I think, in this picture. I have always loved it - her posture, the over-sized glasses, the cool jeans and belt, and her feet that still have baby fat on them!

So my next project is to make a fiber art piece based on this photograph. I did a line drawing tracing from the photograph, and then I enlarged this line drawing to my desired finished size, which is about 25 inches high.

line drawing


enlarged drawing

The enlarged drawing is what I use for patterns for the fabrics for my art quilts. I'll show more of that in the next few posts. Thanks for visiting my blog!


Thursday, October 6, 2016

Mergansers!

I go on a fishing trip every year to the North Umpqua River in Oregon. It is one of the most beautiful places on the planet, in my opinion. There are mergansers on the river, and  I see them on the water or flying  by when I am fishing. They are wonderful to watch and I look forward to seeing them every year.

This is a watercolor painting I did from a photo of the mergansers on the river.

Mergansers by Eileen Wintemute


Friday, September 30, 2016

Flamingo, Flamango! - It's Done!


"Flamingo, Flamango!


Yeah! I have finished this thread painted piece! It took a lot of stitching, but it is done and I'm happy with the way it looks. I painted the white areas at the corners that I talked about in my last post, and put on a binding and sleeve. I've decided to call it "Flamingo, Flamango" because nothing else came to me!

On to my next project....Thanks for visiting my blog!

Thursday, September 22, 2016

Flamingo Stiching Complete!


And I'm finished with the stitching! I think this kind of stitching, with such small spacing, is called micro-stitching, or micro-quilting. I'm glad to have it done! It takes a fair amount of time for a small space!

I am pleased with the appearance though. I should add that I straight stitched the border around the center on my "regular" sewing machine.

My next step is squaring it up and deciding on either a binding or facing for the piece. Right now I'm leaning toward a binding.

I also noticed that a couple corners were not painted to the edge. After I trim it up I will paint those white areas to match the blue. I'll show you that when I get to that stage.


Thanks for visiting my blog!

Wednesday, September 14, 2016

Stitching the Border

I thought I would show you a close up of the border as I am stitching it. You can see the black Frixion pen markings that I followed.


I decided not to do the curlicue stitching between the border around the center and the major fancy horseshoe design.  It was too small to see, I thought and didn't enhance the appearance. I just stitched right over the markings.


I'm always glad when I get to a point that I can press the piece and get rid of the markings. They make it look messy and I get sick of that look. Here it is after pressing, and you can see the difference. It looks a lot cleaner.


I should be done with the rest of the border soon. I'll show you that in my next post. Thanks for visiting my blog!

Tuesday, September 6, 2016

Tin Tile Background Enhancement

I decided to do stitching to enhance the tin tile image in the background of the Flamingo piece. I used a meandering, tightly stitched pattern. To help me see the image better I used a Frixion marker to draw the lines of the design. Then I stitched the area around this design thoroughly. Here are some in-progress photos:


My thought while doing this small stitching is "one-eighth inch spacing". That helps me keep the size of the open areas consistent. The center is done now. On to the border design area! I'll post that when it is done. Thanks for visiting my blog!

Tuesday, August 30, 2016

Thread Painting The Flamingo


So now it's time to do the thread painting. To thread paint the flamingo I use mostly a zig zag stitch back and forth over the area. The zig zag stitch is set to a narrow width and short length. On my machine I use 1.5 for both of these settings. I have an open toe foot on the machine, feed dogs are up and the presser foot is in the darning position. I just go back and forth over the area. It is important to change thread colors as you move to another part of the image. You want to match the color to the bird. Overlap colors at the edges where you transition from one color to the other.

These are the threads I pulled out for this project:


They are mostly 40 weight cottons. Pam Holland says that thinner cotton threads work better, and I'm taking her advise.

So here are some in-progress photos:


I'll show what I'm going to do with the background in my next post. Thanks for visiting my blog!

Tuesday, August 23, 2016

A Very Cool Background Fabric For My Flamingo

Tin Tile Painted Fabric

Teresa Shippy is a friend of mine, and she is well known for her tin tile workshops. She has acquired several ceiling tin tiles, and she teaches you how to use them to make printed images on fabric. This is a piece that I made in one of her workshops. I love it and I think it will be ideal for my flamingo!

If you are interested in learning more about Teresa's tin tile workshops, here is the link to Teresa's blog:

I highly recommend the workshop. It is fun and Teresa is very generous with her knowledge and materials. 


My next step in this fiber art piece is to iron the cut out flamingo on to the background, and then sandwich it for quilting. 


Here is the flamingo on the background. The reason this works so well is the flamingo is a thin shape and allows the tin tile design to be seen. Many appliques would almost completely cover the tin tile image, obstructing too much of what is interesting to me. 


I'll get it basted and then it's on to the thread painting. That I'll show in my next post. Thanks for visiting my blog! 

Tuesday, August 16, 2016

Another Flamingo Textile Art Piece - In Progress

In progress flamingo


So what the heck is this monstrosity? It is my in-progress flamingo. In my last post I talked about using a printed image of a flamingo painting for the background of my thread painting. Well I didn't want to do the whole painting, just one flamingo. So I cut one of the flamingos out of fabric, sort of. The print didn't have the entire flamingo printed on it, so I had to improvise and add in tail feathers and the leg bottom from other flamingos, with some ink drawing from me. It's a bit of a Frankenstein flamingo at this point, but it will improve, I promise!

In fact this is what it looks like after being completely cut out and laid on something white on my floor. It's not so strange looking now.


I forgot to mention that I put fusible on the back of the flamingo before I cut it out. Now that it is cut out and it has a fusible back, I can iron it on to the background fabric for this piece. That will be my next post. Thanks for visiting my blog!

Tuesday, August 9, 2016

Flamingo Textile Art Piece

Years ago I did a painting of flamingos based on a photo I took at a zoo. I used this painting to make a print on fabric through Spoonflower.  The print was the basis for another fiber art piece that is several years old now.

The printed fabric order came with more than one of the flamingo images. I only used one for the original fiber art piece, and I have saved the second one for a long time, waiting to figure out what to do with it.

Flamingo Watercolor Painting
 

A couple of years ago I took a thread painting class from Pam Holland and I was very happy with the technique I learned from her ... and now I have an idea for what to do with the second print of the flamingos!

The thread painting technique requires you to do an under-painting of the image so that the background is the color of the thread. This gives you the correct color even if your thread painting coverage isn't complete. So, I could use the printed image on the fabric as my "under-painting", and stitch on top of it.

That is going to be my next project that I'm showing here. Thanks for visiting my blog!

Tuesday, August 2, 2016

Watercolor Practice

I haven't been doing much watercolor painting in the last couple of years because I'm so motivated to make fiber art, there just isn't enough time for it all! But this summer I decided to take a class and try to refresh myself in the fine art of water color painting. This is one that I completed recently.


I'll post a couple more watercolor paintings as I finish them. Thanks for visiting my blog!

Wednesday, July 27, 2016

Gaggle of Geese Quilting Stitches

Here are some close up shots showing the quilting stitches in this piece.


Thanks for visiting my blog!

Monday, July 18, 2016

Shaped by Fiber III


I have a few fiber art pieces in an exhibit running the months of July and August. The exhibit is called "Shaped by Fiber III" and it is put on by Beyond the Edge Fiber Artists. You can see it at the Cerritos Library, in Cerritos, California - 18025 Bloomfield Avenue, Cerritos, CA (562-916-1350). It is a wonderful display of three dimensional fiber art pieces. I hope you have a chance to see it.

Wednesday, July 13, 2016

Flying Geese in the Background

Linda Friedman asked if the geese in the background were made from transparent fabric, and they were not. I used a blue fabric that I had painted fabric, and then custom painted it to be close to the background fabric. Thanks for asking Linda!

Tuesday, July 12, 2016

Gaggle of Geese - Some Details

I wanted to share a few more things on this piece:

There are seven geese flying across the top of the quilt. I cut out each piece and painted them individually to blend with the background they are near. I wanted them to be a subtle addition, and not detract from the Gaggle walking. Here they are pinned in place.


Close up showing variation in color of the geese:


A section of Flying Geese units were inserted here just below one of the flying geese. I thought that looked cool!


Grounding the Geese:

A put a section of "land" under the feet of the geese so that it didn't look like they were floating on air. It also looked a little like a shadow.


Thanks for visiting my blog!