Friday, June 6, 2014

I'll be doing a lecture and workshop on June 14th...

I've been asked to provide a lecture/trunk show and teach a "Tie-Scape" workshop on June 14th at the Surface Art Association meeting in Burbank, California. This is a description of the lecture:

"My Journey As an Art Quilter…So Far

We all start somewhere. During her talk Eileen Wintemute will describe how she transitioned from traditional quilter to art quilter to artist. She will give a trunk show of work showing her progression along this pathway and describe how her background in watercolor painting has influenced her work. She will also talk about what inspires her as an artist and provide tips for making art quilts. "

The workshop will involve creating a simple city scape using a couple of re-purposed men's ties. 

Meetings of the Surface Art Association are held on the campus of Woodbury University. 7500 N. Glenoaks Blvd., Burbank, CA 91504. Meetings begin at 10:00 am. Sign-in begins at 9:30 am.


Wednesday, June 4, 2014

Palm Canyon Construction Technique

This series of blog posts describes the process I used to make the commissioned Palm Canyon art quilt shown below.  Today’s post is about my overall construction method. Prior steps are shown in my previous posts. 


Starting Construction of the Top


My first step is to take my “to scale” sketch to FedEx office and have it printed  full size on one of their large format printers. Here is the enlarged drawing laying on my floor. It is about 3 feet by 4 feet. It would have been better to enlarge just a line drawing instead of my value sketch because it makes it easier to see where a piece starts and stops. Oh well, I'll try to remember that next time!


I use this enlarged sketch to make pattern pieces of each part of the design. My pattern pieces are made from freezer paper. I lay the freezer paper over the enlarged sketch, draw the outline of the item and then cut the pattern out of the freezer paper. The freezer paper pattern is then ironed to the fabric and the piece is cut out. I sometimes leave an extra ¼ inch around the edges if I intend to turn the edge under, or slide this piece behind another. This photo shows the freezer paper patterns for some of the hills and waterfall area. 


I decided to also draw the outline of the image onto a piece of muslin and use the muslin as a background for the top.  I laid the muslin over the enlarged sketch and used a Frixion pen to mark key lines on the muslin. I didn't mark every line on the muslin, just enough to give me a guide line for placement of fabric.The next step was to sandwich the muslin, batt and back together right from the start.


I placed the cut out fabric pieces to the muslin as I went along.This photo shows the markings for the subsurface design on the muslin next to the trailhead area. You can barely see my lines, but they are there.


 Sometimes I used glue stick or white fabric glue as a temporary hold for the fabric pieces. I have found that watering down the glue a little and applying it with a flat paint brush avoids any the possibility of the area that got glue on it showing up on the top.


But, as soon as I had a few pieces placed that I was satisfied with, I went to my quilting machine and quilted those pieces down. I approached construction this way because the quilt was a little on the large side and this method would make managing the top construction easier. I avoided fabrics shifting or falling off when I moved on to the next section. I found it worked well and would do it again the next time.

That was my overall approach to constructing this quilt. My next posts will show how I put the various sections of the quilt together.  Thanks for visiting my blog!

Thursday, May 29, 2014

Palm Canyon Colors

This series of blog posts describes the process I used to make the commissioned Palm Canyon art quilt shown below.  Today’s post describes how I decided what colors to use in this piece.  Prior steps are shown in my previous posts.


Color Plan and Palette

Once I have the sketch finished, the next step is to figure out my color plan. I usually take a line diagram of my sketch and make about 5 or 6 black and white copies of it. Then I pull out my watercolor paints and start applying color to the copies, experimenting until I get something I like. I paint directly on the copier paper. This is just a plan to figure out what colors I want to use. It’s not intended to be a watercolor painting.  This plan guides my fabric selections and makes all the next steps go faster. I keep it on hand through-out the top construction process.This is the color plan I came up with for this piece.  


It's interesting to see the finished color versus the plan. Nevertheless, this was my guide for fabric choices throughout the process.

The next step is to start pulling fabrics that correspond with the colors and values shown. Sometimes I will have a color that is close to what I am after but not quite right. I have found that adding a layer of tulle or organza can tone up or down a fabric and get me the value I am after.

This is the palette of fabrics I pulled for this quilt. Fortunately I had most of these in my stash. I did have to buy some new fabrics, but that’s ok. I suffered through the difficulty of fabric shopping.J


Next post is my construction method. Thanks for visiting my blog!

Thursday, May 22, 2014

Palm Canyon Design

The Palm Canyon landscape art quilt shown on my previous post was commissioned by a woman very familiar with the location. She rides her horse into this canyon and finds a wonderful sense of peace and solitude. There are specific features in this area that she wanted in the art quilt, such as the waterfall, palm trees, hillsides, rock formations, etc. She is also a geologist and wanted a cross-section of the the subsurface to be depicted. In particular she wanted some of the rock folding and faults to be included.

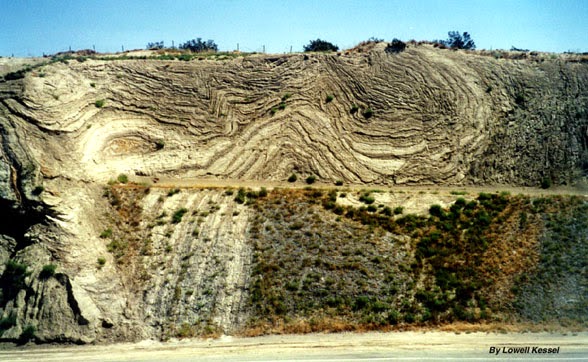
She sent me a link to a college geology Professors website that was very helpful. I went back to school a bit to figure that aspect of this quilt out. Having previously worked in the environmental field was also very helpful! This is a photo of a road cut in the area that shows the folding and bending of the soil layers that has occurred. I can see great design lines in this photo!


I have been to the Palm Canyon area and had an idea of what the area  looks like, but I did some Internet research to get some reference photos for the design.  These are some photos of the Palm and Indian Canyon areas that I found on the Internet that helped me figure out how to depict the important features for this quilt.


This is a photo showing my messy design process. I go through several sketches when I do a design, refining again and again until I come up with my final plan.


And this is the final design. It includes the oasis, waterfall, palms, trail, rolling hills, jutting rocks and other features that this area is known for. The subsurface also shows folding of the rocks and soil layers that has occurred over the eons of time, and some faults. The drawing got the "okey dokey" from the client, so now its on to the color plan. That will be the subject of my next post.


Thanks for visiting my blog!

Sunday, May 18, 2014

Palm Canyon Landscape

A few months ago I completed a landscape quilt that had a town, farm and other human developments on the land, and it had a cross-section that showed the subsurface below the land. This fiber art piece was called "Transects in Time", and it was made for someone who works for the Regional Water Quality Control Board (RWQCB) of California. This is a state agency charged with protecting the waters of the State of California. A photo of the art quilt was put in the State RWQCB newsletter. I was contacted by another person who works for the RWQCB and commissioned to make a landscape quilt also showing a cross-section of the subsurface. This is the finished quilt.

Palm Canyon 

 The area depicted is the Palm/Indian Canyon near Palm Desert. I will be giving doing some more posts showing the making of this piece in the next few weeks. I was happy with is and so is the owner. :-)

Wednesday, April 30, 2014

Shannon's Parrot

I'm always on the lookout for budding artists, and here is one to keep an eye on. This is Shannon with her pretty pink parrot. She used pastel chalk to make this art work.  I am very impressed with the use of complimentary colors and the shading on the parrot and perch. Great job Shannon!


Shannon's Parrot

Friday, April 25, 2014

My Cup Ranneth All Over The Patio - finishing touches


The finishing touches for this piece include beading and binding. I wanted to use beads to depict the bird seed that is overflowing the cup, running all over the patio, and feeding the doves.

Here you see the top with beads laid out in their intended locations. It took a little bit of moving them around, but that is what I wanted. I put some marks on the top to remind my self of what I had in mind, because as soon as you pick the piece up to sew a bead down, they all roll off.


So the next step is the stitching and that's what I did.Here are some close ups showing the beads stitched down.


To finish the edge I used a satin stitch with thread the color of the dark areas on the doves. Here it is with the satin stitching on the edge.


And that's it for the posts for this piece! Thanks for visiting my blog!